Your roof is your home's first defense against Texas weather—intense heat, severe storms, hail, and everything in between. Yet most homeowners never inspect their roof until there's a visible problem like a leak or missing shingles.
By then, minor issues have often become major expenses.
Regular DIY roof inspections catch problems early when they're cheap and easy to fix. A $200 repair today prevents a $5,000 problem next year. But climbing on your roof without knowing what to look for—or doing it unsafely—can be dangerous and ineffective.
This comprehensive guide teaches Texas homeowners how to conduct thorough, safe roof inspections from the ground and (when safe) from the roof itself. You'll learn what to look for, when to inspect, how to document findings, and most importantly—when to call a professional instead of DIY.
Download: Grab our free printable Roof Inspection Checklist to follow along as you inspect—includes seasonal checklists, what to document, and an attic walkthrough guide.
Why Regular Roof Inspections Matter
The Financial Case
Small Problems Become Big Expenses:
- Missing shingle today: $50 repair
- Same spot after 6 months: $500 decking repair
- After 2 years: $5,000 structural damage + interior repairs
Insurance Claims:
- Storm damage has time limits (often 1 year)
- Document condition before/after storms
- Early detection = successful claims
Resale Value:
- Well-maintained roofs add value
- Documented maintenance history attracts buyers
- Avoid last-minute expensive repairs before selling
Warranty Protection:
- Most warranties require regular maintenance
- Document inspections to protect coverage
- Catch manufacturer defects within warranty period
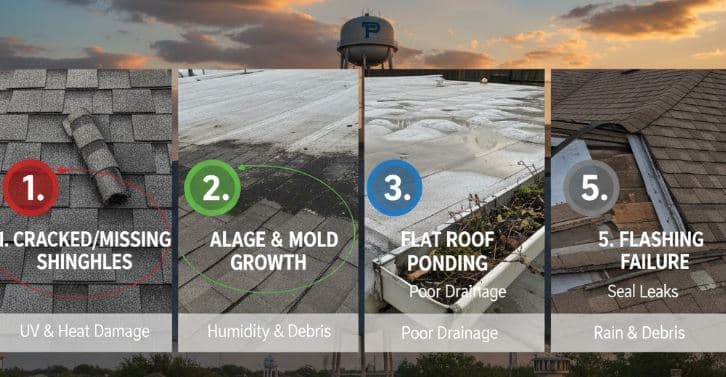
What Inspections Catch
Common Issues Found Early:
- Missing or damaged shingles
- Flashing separation around chimneys
- Clogged gutters causing water backup
- Tree branches rubbing against roof
- Early signs of algae or moss growth
- Loose or exposed nails
- Cracked rubber boots around vents
- Granule loss on shingles
Each of these is inexpensive to fix immediately—but catastrophically expensive if ignored for years.
Safety First: When NOT to DIY
Absolute Never-Climb Situations
❌ DO NOT climb on roof if:
-
Steep Pitch (7/12 or steeper)
- Too dangerous without safety equipment
- Hire professional instead
- Ground inspection only
-
Wet or Icy Conditions
- Extreme slip hazard
- Wait for dry, calm weather
- No exceptions
-
Windy Conditions (15+ mph)
- Risk of being blown off
- Difficult to maintain balance
- Postpone inspection
-
Health/Mobility Limitations
- Dizziness, balance issues
- Joint problems, recent surgery
- Not confident with heights
- No shame in hiring professional
-
Damaged or Weak Roof Structure
- Visible sagging
- Suspected water damage
- Old, deteriorated roofing
- Professional assessment required
-
Multi-Story Home (3+ stories)
- Too high for safe DIY
- Specialized equipment needed
- Professional only
-
Near Power Lines
- Contact with lines is fatal
- Maintain 10-foot clearance
- Call professional if close
Required Safety Equipment
Minimum Safe Equipment:
If Climbing on Roof:
- Non-slip rubber-soled shoes (never sandals or bare feet)
- Long pants (protect against abrasion)
- Gloves (protect hands from sharp edges)
- Roof anchor point and fall protection (steep roofs)
- Spotter on ground (someone watching)
- Fully charged cell phone
For Ground Inspection:
- Binoculars (8x to 10x magnification)
- Camera or smartphone
- Ladder (if inspecting gutters/eaves)
- Flashlight (for interior attic check)
- Notepad or phone for notes
Ladder Safety Rules
When Using Ladder:
✓ Extend 3 feet above roof edge
✓ Set at 75° angle (1 foot out per 4 feet up)
✓ On solid, level ground
✓ Secured at top and bottom
✓ Three points of contact always
✓ Face ladder when climbing
✓ Don't carry tools (use tool belt)
❌ NEVER:
- Use damaged ladder
- Lean ladder against gutter
- Overreach to either side
- Climb in windy conditions
- Use on soft or uneven ground
The Complete Exterior Roof Inspection
From-the-Ground Inspection (Safest Starting Point)
What You Can See Without Climbing:
Use Binoculars to Check:
-
Overall Roof Appearance
- Sagging areas (indicates structural issues)
- Uniform color and texture
- Obvious missing or damaged shingles
- Debris accumulation
-
Shingle Condition
- Curling edges
- Missing granules (shiny spots)
- Cracked or broken shingles
- Lifted or displaced shingles
-
Roof Edges and Eaves
- Damaged or missing drip edge
- Fascia rot or damage
- Soffit ventilation clear
- Paint condition
-
Chimneys and Vents
- Flashing intact and flat
- No gaps or separation
- Chimney cap secure
- Vent boots not cracked
-
Gutters (Ground Level)
- Sagging sections
- Detached from fascia
- Rust or holes
- Standing water
Walk Entire Perimeter:
- Photograph all four sides
- Note any anomalies
- Check ground for fallen shingle granules (sign of wear)
- Look for signs of leaks from interior (water stains on exterior walls)
From-the-Roof Inspection (If Safe to Climb)
Only proceed if:
- Low to moderate pitch (6/12 or less)
- Dry conditions
- Calm weather
- Confident and properly equipped
Systematic Inspection Method:
1. Start at Lowest Point
- Climb up from bottom
- Work your way systematically
- Never turn back to roof while descending
2. Check Each Section:
Shingle Field (Main Roof Area):
Walk carefully (weight on balls of feet), checking:
✓ Missing shingles or tabs
✓ Cracked, curled, or buckled shingles
✓ Exposed or loose nails
✓ Granule loss (bald spots)
✓ Algae or moss growth (black streaks or green patches)
✓ Blistering or bubbling
✓ Improper or inconsistent pattern
3. Valleys (Critical Areas)
Valleys concentrate water flow—inspect closely:
✓ Valley flashing intact
✓ No gaps or separations
✓ Shingles properly cut and aligned
✓ No debris accumulation
✓ Water staining indicating leaks
4. Flashing Around Penetrations
Every chimney, vent, skylight:
✓ Flashing lies flat against surface
✓ No gaps between flashing and surface
✓ Sealant not cracked or missing
✓ Step flashing visible on chimneys
✓ Counter-flashing intact
5. Vents and Boots
Plumbing Vents:
- Rubber boots: Check for cracks, splits, or hardening
- Should be flexible, not brittle
- Common failure point after 10-15 years
Exhaust Vents:
- Cap secure
- Screen not clogged
- Flashing sealed
Ridge Vents:
- Cap shingles intact
- No gaps allowing rain entry
- Properly vented inside
6. Chimney Inspection
✓ Crown: No cracks or deterioration
✓ Cap: Secure, screen intact
✓ Mortar: No missing or crumbling joints
✓ Flashing: Multiple layers properly installed
✓ Counter-flashing: Secure in mortar joints
7. Roof-to-Wall Intersections
Where roof meets vertical wall:
✓ Step flashing visible (should see metal)
✓ Counter-flashing or siding overlaps step flashing
✓ No gaps
✓ Sealant intact if used
8. Ridge and Hip Caps
Top of roof:
✓ Cap shingles intact
✓ No missing sections
✓ Properly nailed
✓ No wind damage
9. Gutters and Downspouts
✓ Securely attached
✓ Proper slope (water flows)
✓ No standing water
✓ Clear of debris
✓ Downspouts discharge away from foundation
Interior Attic Inspection (Critical Component)
Never skip the attic—many issues show here first.
What to Look for in Attic
1. Water Stains and Leaks
✓ Dark stains on underside of roof decking
✓ Water trails along rafters
✓ Mold or mildew smell
✓ Active dripping (during/after rain)
✓ Rusty nails poking through
Photo every stain—helps identify leak location on exterior.
2. Structural Issues
✓ Sagging rafters or decking
✓ Cracks in decking
✓ Separated or damaged trusses
✓ Wood rot
✓ Insufficient support
Call structural engineer if concerned.
3. Ventilation
✓ Insulation not blocking soffit vents
✓ Ridge vent or gable vents present
✓ Airflow evident
✓ No excessive heat buildup
Poor ventilation = shorter roof life.
4. Insulation Condition
✓ Proper depth (R-30 to R-38 for Texas)
✓ Dry (wet insulation indicates leak)
✓ Evenly distributed
✓ Not compressed
5. Pests and Nests
✓ No rodent droppings
✓ No wasp or hornet nests
✓ No evidence of animals
✓ Screens on vents intact
6. Daylight Visible
✓ Should NOT see light through roof
✓ If you do, there's a hole
✓ Immediate repair needed
Attic Safety
- Wear dust mask (insulation fibers)
- Watch your step (step only on joists, not between)
- Bring flashlight (attics are dark)
- Avoid touching electrical (wires, junction boxes)
- Watch for nails (protruding through decking)
Seasonal Inspection Checklist
Different seasons bring different issues—tailor inspections accordingly.
Spring Inspection (March-April)
Focus: Storm Damage & Growth
✓ Check for winter storm damage
✓ Look for hail damage from spring storms
✓ Inspect for algae/moss starting to grow
✓ Clean gutters of winter debris
✓ Trim overhanging branches before summer storms
✓ Check flashing before rainy season
Why: Spring storms common in Texas. Catch issues before summer heat or hurricane season.
Summer Inspection (July-August)
Focus: Heat Damage & Ventilation
✓ Check for heat-related shingle deterioration
✓ Look for curling from heat exposure
✓ Verify adequate ventilation (feel attic temperature)
✓ Inspect for sun damage on south/west slopes
✓ Check for buckled shingles from expansion
✓ Look for granule loss
Why: Texas heat peaks July-August. Shingles age fast in 100°F+ temps. Ventilation critical.
Fall Inspection (October-November)
Focus: Prepare for Winter & Clear Debris
✓ Clean gutters of fallen leaves
✓ Remove tree debris from roof
✓ Check for damage before winter rains
✓ Inspect seals and flashing
✓ Trim branches before ice storms
✓ Document condition before winter
Why: Prepare for winter weather. Clear debris before rain season begins.
Winter Inspection (January)
Focus: Water Intrusion & Ice Damage
✓ Check for leaks after heavy rains
✓ Look for ice damage (if applicable)
✓ Monitor attic for water stains
✓ Check for wind damage after storms
✓ Ensure gutters draining properly
✓ Look for signs of poor drainage
Why: Winter brings Texas rain. Check for leaks. Identify issues before spring storm season.
After-Storm Inspection (Critical)
Inspect within 24-48 hours after:
- Hail storm
- High winds (40+ mph)
- Heavy rain
- Tornado nearby
Hail Damage Signs
From Ground:
- Dented gutters, downspouts, or AC units (indicates hail size)
- Dented vents or flashing
- Damaged landscaping or vehicles
From Roof:
- Random pattern of dents/divots in shingles
- Loss of granules (shiny spots)
- Cracked or punctured shingles
- Damaged ridge caps
Document everything with photos + date stamp.
Wind Damage Signs
- Missing shingles or tabs
- Lifted shingle edges
- Damaged or missing ridge caps
- Debris impact damage
- Fallen tree branches
Water Damage Signs
- Standing water in gutters or on roof
- Interior ceiling stains
- Drips in attic
- Water marks on exterior walls
If significant damage found, call insurance company within 72 hours.
Documentation: Why and How
Why Document Everything
1. Insurance Claims
- Proof of damage
- Before/after comparison
- Supports claim value
- Time-stamps event
2. Warranty Protection
- Proves regular maintenance
- Documents defects within warranty period
- Shows proper care taken
3. Track Deterioration
- Compare year-over-year
- Predict replacement timing
- Budget for repairs
4. Resale Value
- Show maintenance history to buyers
- Justify asking price
- Provide confidence to buyers
How to Document
Create Inspection File:
Each Inspection Record:
- Date
- Weather conditions
- Overall condition rating (1-10)
- Issues found (list)
- Photos (20-30 minimum)
- Actions taken/needed
Photo Checklist:
✓ Four sides of house (full roof in frame)
✓ Close-ups of each slope
✓ Every chimney, vent, skylight
✓ All valleys
✓ Ridge and hip caps
✓ Any damage or issues (multiple angles)
✓ Gutters (several sections)
✓ Attic stains or issues
Photo Tips:
- Date-stamp enabled
- Consistent angles each inspection
- Include scale reference (quarter) for damage
- Shoot in good lighting
- Take more than you think you need
Storage:
- Cloud backup (Google Photos, Dropbox)
- Organized by date
- Separate folder for storm damage
- Keep forever (seriously)
Common Problems and Solutions
Problem 1: Missing or Damaged Shingles
Signs:
- Visible bare spots
- Tabs blown off
- Cracked shingles
DIY Solution (if comfortable):
- Individual shingle replacement: $5-$10 per shingle
- Roofing cement: $10 per tube
- Few hours work
Call Pro If:
- Multiple shingles missing
- Widespread damage
- Near flashing or valleys
- Not comfortable on roof
Cost Range:
- DIY: $20-$50 materials
- Pro: $150-$300 service call
Problem 2: Granule Loss
Signs:
- Shiny or bald spots on shingles
- Granules in gutters
- Uneven coloring
What It Means:
- Normal aging (after 15+ years)
- Accelerated from heat
- Approaching end of life
Solution:
- Monitor rate of loss
- If widespread: Plan for replacement within 2-5 years
- No DIY fix
Cost: Replacement planning
Problem 3: Curling Shingles
Signs:
- Edges lifting up
- Cupping in center
- Buckled appearance
Causes:
- Age and heat exposure
- Poor ventilation
- Improper installation
DIY Solution (Temporary):
- Apply roofing cement under curled edges
- Nail down (carefully)
- Only fixes aesthetics, not underlying cause
Long-term:
- Improve ventilation
- Plan replacement
Cost:
- DIY: $50-$100
- Pro: $200-$400
Problem 4: Cracked Rubber Boots
Signs:
- Cracks in rubber around plumbing vents
- Hardened/brittle rubber
- Gaps between boot and pipe
Solution:
- Replace rubber boot: $15-$25 each
- 30-minute job
- Beginner-friendly DIY
Steps:
- Remove shingles around old boot
- Pull out old boot
- Slide new boot over pipe
- Seal with roofing cement
- Replace shingles
Cost:
- DIY: $15-$25 per boot
- Pro: $100-$150 per boot
Problem 5: Separated Flashing
Signs:
- Gap between flashing and chimney/wall
- Lifted edges
- Missing sealant
DIY Solution:
- Clean area thoroughly
- Apply quality roofing sealant
- Press flashing flat
- May need to re-nail
Call Pro If:
- Large gaps
- Flashing damaged or rusted
- Step flashing issues
- Not confident in repair
Cost:
- DIY: $20-$40 (sealant)
- Pro: $200-$500
Problem 6: Clogged Gutters
Signs:
- Overflowing during rain
- Sagging gutters
- Plant growth
- Standing water
DIY Solution (Easy):
- Clean twice yearly (spring & fall)
- Remove debris by hand
- Flush with hose
- Check downspouts clear
Tools:
- Gloves
- Bucket
- Ladder
- Garden hose
Consider:
- Gutter guards: $5-$10 per foot
- Reduce cleaning frequency
Cost:
- DIY: Free (just time)
- Pro cleaning: $100-$200
- Gutter guards installed: $1,000-$2,000
Problem 7: Algae/Moss Growth
Signs:
- Black streaks (algae)
- Green patches (moss)
- Usually north-facing slopes
DIY Solution:
- Mix: 1 part bleach, 3 parts water
- Spray affected area
- Let sit 15-20 minutes
- Rinse thoroughly
- NEVER pressure wash (damages shingles)
Prevention:
- Trim overhanging branches
- Install zinc or copper strips at ridge
- Improves air circulation
Cost:
- DIY: $20-$30
- Pro: $300-$600
When to Call a Professional
You've Found Something Serious
Immediate Professional Assessment Needed:
❌ Structural Issues:
- Sagging roof deck
- Cracked or damaged rafters
- Water-damaged wood
❌ Major Leaks:
- Active water intrusion
- Multiple leak points
- Large water stains in attic
❌ Widespread Damage:
- Storm damage affecting large area
- Multiple missing shingles
- Significant hail damage
❌ Flashing Failures:
- Chimney flashing completely separated
- Valley flashing damaged
- Complex flashing issues
❌ Safety Hazards:
- Roof too steep or high for DIY
- Uncertain about structural integrity
- Near power lines
Annual Professional Inspection
Even if DIY inspecting, get pro inspection:
- Every 3-5 years minimum
- After major storms
- When buying/selling home
- If roof is 15+ years old
- Before warranty expires
What Pros See That You Might Miss:
- Subtle signs of future failure
- Improper installation from previous work
- Manufacturing defects
- Ventilation inadequacy
- Structural concerns
Cost: $150-$300 for thorough inspection
Value: Catches $5,000+ problems early
Tools and Supplies for DIY Inspection
Essential Tools ($100-$200 investment)
Safety Equipment:
- Non-slip shoes: $50-$100
- Work gloves: $10-$20
- Fall protection (steep roofs): $100-$300
Inspection Tools:
- Quality binoculars (8x-10x): $30-$100
- Flashlight (bright LED): $20-$50
- Measuring tape: $10-$20
- Notepad or phone for notes: $0-$5
Photography:
- Smartphone camera (likely have)
- Optional: Drone for difficult views: $300-$1,000
Ladder (if needed):
- Extension ladder (appropriate height): $150-$400
- Ladder stabilizer: $40-$80
Inspection Forms and Checklists
Download our comprehensive checklist:
- Exterior checklist (printable)
- Interior/attic checklist
- Seasonal inspection guide
- Photo documentation template
- Issue tracking log
[Request free downloadable PDF checklist]
📧 Email tx@rippleroofs.com
Subject: 'DIY Inspection Checklist Request'
Creating Your Inspection Schedule
Recommended Frequency
Twice-Yearly Minimum:
- Spring (March-April): Post-winter check, pre-summer prep
- Fall (October-November): Clear debris, pre-winter prep
Additional Inspections:
- After every significant storm (hail, high wind, tornado nearby)
- Before/after hurricane season
- After nearby construction (debris may have blown onto roof)
- If you notice interior stains or leaks
Set Calendar Reminders
Don't rely on memory:
- Set recurring calendar reminders
- Pair with other seasonal tasks (HVAC maintenance, gutter cleaning)
- Track in home maintenance app
- Note last inspection date
Inspection Time Requirements
From-Ground Inspection:
- Time: 30-45 minutes
- Frequency: Quarterly
- Difficulty: Easy
Full Exterior + Interior:
- Time: 2-3 hours
- Frequency: Twice yearly
- Difficulty: Moderate
Post-Storm Check:
- Time: 1 hour
- Frequency: As needed
- Difficulty: Easy to moderate
Red Flags: Call Professional Immediately
Don't DIY these situations:
🚨 Immediate Professional Needed:
- Active leaks during rain
- Structural sagging visible from ground
- Large sections of shingles missing
- Chimney leaning or damaged
- Exposed wood decking
- Multiple roof penetrations leaking
- Mold visible in attic
- Electrical hazards near roof
These are emergencies—call immediately, don't wait.
Austin-Specific Considerations
Texas Weather Challenges
Intense Heat:
- Roof surface temps: 160-180°F in summer
- Accelerates aging
- Increases brittleness
- Inspect for heat damage quarterly
Hail Season (March-June):
- Peak months: April-May
- Inspect after EVERY hailstorm
- Document immediately
- File insurance claims promptly
Hurricane Season (June-November):
- Monitor forecasts
- Pre-storm inspection
- Post-storm inspection within 48 hours
- Check wind damage carefully
Extreme Temperature Swings:
- 30°F winter mornings to 70°F afternoons
- Expansion/contraction stress
- Check for cracking
Local Code Requirements
Austin Building Code:
- Must maintain roof in weather-tight condition
- Address deficiencies promptly
- Permits required for replacement (not repairs)
Insurance Considerations
Texas Law:
- Must file claim within policy timeframe (often 1 year)
- Insurance can't require specific contractors
- Document everything thoroughly
- Get multiple repair estimates
Your Inspection Action Plan
First Inspection: Get Baseline
This Weekend:
Step 1: From-Ground Inspection (45 minutes)
- Walk perimeter with binoculars
- Photograph all four sides
- Note any obvious issues
- Check gutters from ground
Step 2: Interior/Attic Check (30 minutes)
- Look for stains
- Check ventilation
- Note insulation condition
- Photo any concerns
Step 3: Document Findings (15 minutes)
- Create inspection file
- Record condition (1-10 rating)
- List any issues found
- Establish baseline
Step 4: Make Repair List
- Prioritize by urgency
- Get quotes for pro repairs
- Schedule DIY repairs
- Set timeline
Set Up Recurring Schedule
Calendar Reminders:
- April 1: Spring inspection
- October 1: Fall inspection
- After storms: Check condition
Annual Pro Inspection:
- Schedule every 3-5 years
- Or when roof reaches 15 years old
- Get written report
Build Your Inspection Kit
One-Time Investment (~$150):
- Binoculars
- Gloves
- Flashlight
- Notepad
- Safety shoes
Maintenance Supplies (~$50):
- Roofing cement
- Caulk gun
- Sealant
- Spare shingles (if available)
Stay Proactive
Mindset Shift:
- Inspections prevent problems
- 2-4 hours per year protects $15,000+ investment
- Early detection saves thousands
- Peace of mind is priceless
Frequently Asked Questions
Is it ever safe to inspect my roof myself, or should I always call a professional? Ground-level and attic inspections are safe for most homeowners and catch roughly 80% of visible problems. Getting on the roof itself is only advisable on low-pitch roofs (6/12 or less) in dry, calm conditions — anything steeper, wet, windy, or multi-story should go straight to a professional.
How can I tell if a stain in my attic is an active leak or an old, already-fixed one? Press the stained area gently — if it's soft or damp, it's active or recent. A hard, dry, discolored patch with no odor is typically old damage. Either way, photograph it and monitor during the next rain to confirm.
What's the very first thing I should check if I suspect storm damage? Your gutters and downspouts. Dark, sand-like granules washing out are the clearest early sign of hail or wind impact, and they're visible from the ground without any special equipment.
How often do professionals recommend a full inspection versus a quick DIY check? DIY ground-level checks are worth doing quarterly, but a full professional inspection every 3-5 years — or annually once your roof passes 15 years old — catches issues a homeowner's eye typically misses, like subtle flashing separation or early mat fractures.
Get Professional Roof Inspection
While DIY inspections are valuable, professional assessments catch what you might miss.
Ripple Roofing & Construction provides comprehensive roof inspections with detailed reports.
Schedule Professional Inspection:
📞 Call (512) 763-5277
📧 Email tx@rippleroofs.com
🌐 Visit rippleroofs.com/estimate
Our Inspection Service Includes:
- Complete exterior examination
- Attic and ventilation assessment
- Detailed photo documentation
- Written report with findings
- Repair recommendations and pricing
- Warranty compliance verification
Serving Round Rock, Austin, Georgetown, Cedar Park, Pflugerville, Leander, and all Central Texas.
Protect your investment. Stay ahead of problems. Inspect regularly.